Did you know that OpenAI has enabled access to their LLMs via APIs? With this, devs can now have the power of LLMs in their apps.
Go to https://openai.com/api/ to view API capabilities. After that, go to their playground page.
https://platform.openai.com/playground/chat?models=gpt-4o
Before you could do anything though, you’d need to setup payment and add some to your account. If you already have ChatGPT+ (the $20/mo subscription), you would still need to pay for the API access as they are considered exclusive of each other.
Now, once you’ve done that, you can tinker with the playground page. It consists of the following:
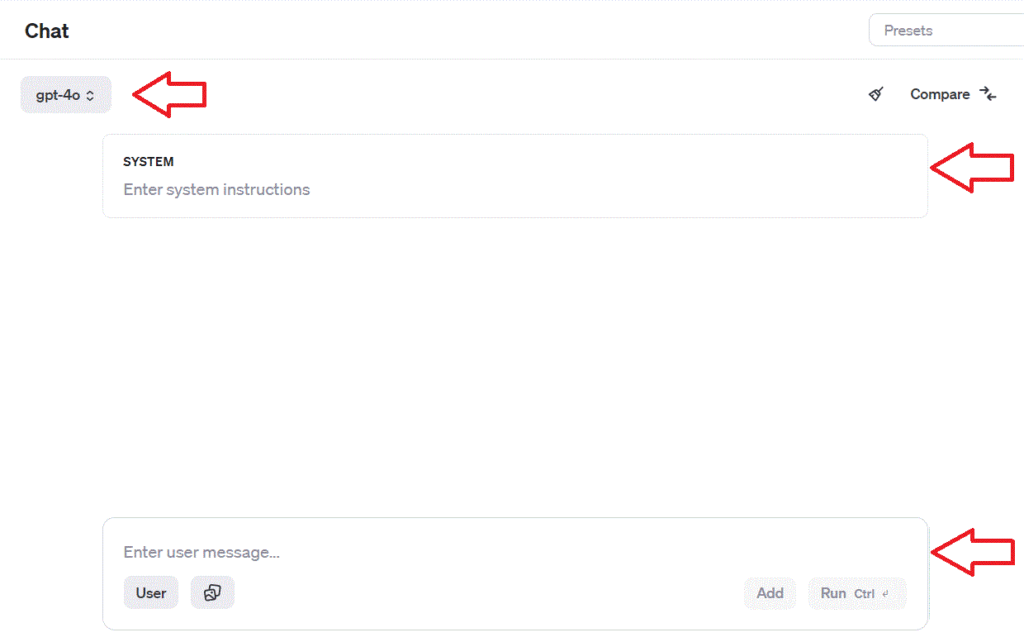
- Model – the LLM model you’ll be using.
- System Instructions – you can give your LLM instructions. You can give them context to the questions that are going to be asked, or the manner in which they respond. Some examples:
- “You are an expert in chemistry that easily tailors explanations to 10 year olds”
- “You are a pirate captain being interviewed about your knowledge of pirate life.”
- “You will be given text in either English or Turkish. Your job is to translate one to the other.”
- User message – this is where you type your questions or requests.
So put something in the system instructions and user message boxes, and see the LLM in action.
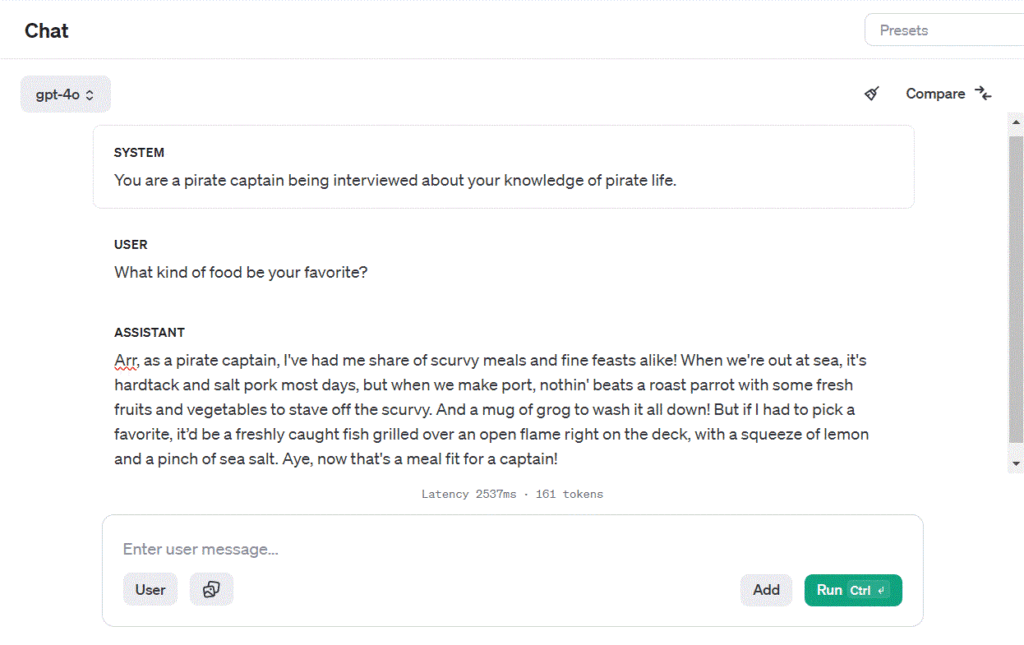
Now we got that out of the way, how are we going to translate this to .Net?
Let’s create a console app.
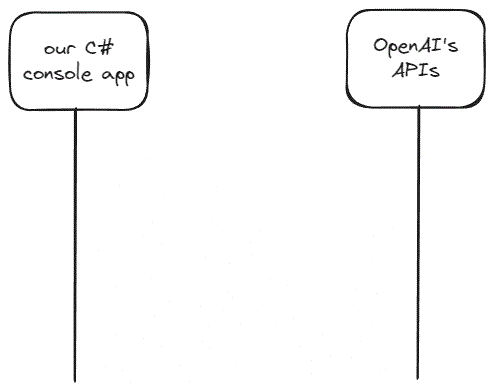
It is basically a simple Http Post request-response. So, we’ll use an HttpClient class.
We will be sending an Http Request with the following data:
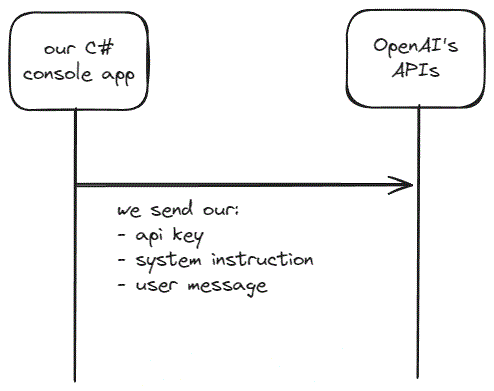
We can then expect a response from OpenAI’s API endpoints with the following data:
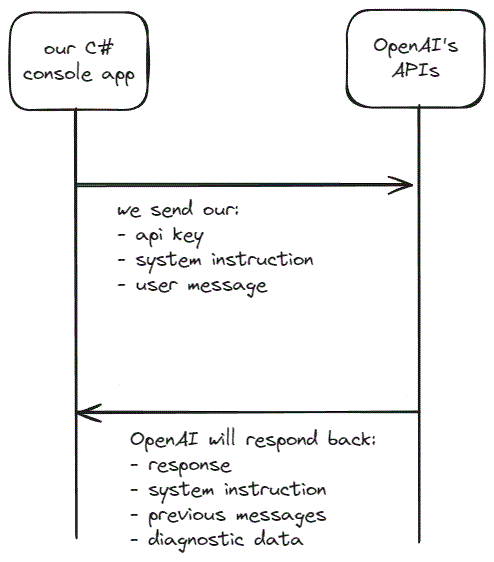
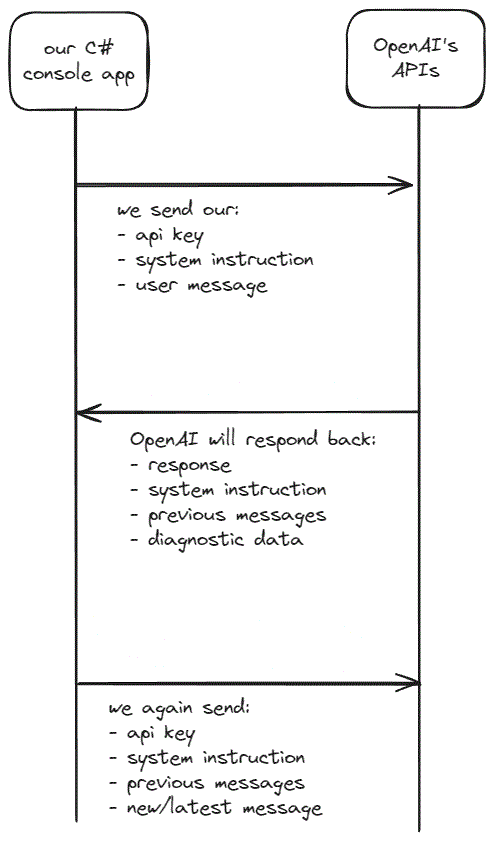
There is something important to note here. The response contains the previous exchanges between the user and the agent. This is to maintain a record of the conversation. ChatGPT needs this history so it has some context where the conversation is going. You can think of it as ChatGPT not having memory of what the conversation was about unless you send it as well. In programming parlance, it does not “maintain state”.
If we have a followup questions, we send back the same data as before but now also include the previous exchanges.
Now let’s look at our C# code. Now to keep things as simple as possible, this app is a simple 1-request-1-response. After that, the app exits.
static async Task Main(string[] args)
{
    // Your OpenAI API key
    string apiKey = Environment.GetEnvironmentVariable("MY_OPENAI_KEY");
    if (string.IsNullOrWhiteSpace(apiKey))
    {
        Console.WriteLine("Missing OpenAI API key.  Exiting...");
        return;
    }

    Console.Write("\nWhat do you want to ask ChatGPT? ");
    string question = Console.ReadLine();

    Console.WriteLine("responding...");

    string answer = await GetGptResponse(question, apiKey);
    Console.WriteLine($"\nAnswer:\n{answer}");
}
In the code above is the Main() function that shapes the overall flow of our app. It handles missing api key (that you get from OpenAI’s Api site) and asks the user for a question. (In this case, the api key is stored in the local machine’s environment variables.) When the user enters a question, it calls a method GetGptResponse and this is where the magic happens.
private async static Task<string> GetGptResponse(string msg, string apiKey)
{
    const string LLM_MODEL = "gpt-4o";
    const string ENDPOINT = "https://api.openai.com/v1/chat/completions";

    using (HttpClient client = new HttpClient())
    {
        client.DefaultRequestHeaders.Add("Authorization", $"Bearer {apiKey}");

        var requestBody = new
        {
            model = LLM_MODEL,
            messages = new[]
            {
                new { role = "user", content = msg }
            }
        };

        var json = JsonSerializer.Serialize(requestBody);
        var content = new StringContent(json, Encoding.UTF8, "application/json");

        HttpResponseMessage response = await client.PostAsync(ENDPOINT, content);
        response.EnsureSuccessStatusCode(); //this makes the client throw an Exception if the status code is not success

        string responseBody = await response.Content.ReadAsStringAsync();
        var responseJson = JsonDocument.Parse(responseBody);

        string answer = responseJson.RootElement
            .GetProperty("choices")[0]
            .GetProperty("message")
            .GetProperty("content")
            .GetString();
        return answer;
    }
}
The above method sets up the Chat GPT model used and the API endpoint used. After which, it sends a POST request with a properly formatted data payload.
Below is the full code:
using System.Text;
using System.Text.Json;

namespace connect_to_openai
{
    static class Program
    {
        static async Task Main(string[] args)
        {
            // Your OpenAI API key
            string apiKey = Environment.GetEnvironmentVariable("MY_OPENAI_KEY");
            if (string.IsNullOrWhiteSpace(apiKey))
            {
                Console.WriteLine("Missing OpenAI API key.  Exiting...");
                return;
            }

            Console.Write("\nWhat do you want to ask ChatGPT? ");
            string question = Console.ReadLine();

            Console.WriteLine("responding...");

            string answer = await GetGptResponse(question, apiKey);
            Console.WriteLine($"\nAnswer:\n{answer}");
        }

        private async static Task<string> GetGptResponse(string msg, string apiKey)
        {
            const string LLM_MODEL = "gpt-4o";
            const string ENDPOINT = "https://api.openai.com/v1/chat/completions";

            using (HttpClient client = new HttpClient())
            {
                client.DefaultRequestHeaders.Add("Authorization", $"Bearer {apiKey}");

                var requestBody = new
                {
                    model = LLM_MODEL,
                    messages = new[]
                    {
                        new { role = "user", content = msg }
                    }
                };

                var json = JsonSerializer.Serialize(requestBody);
                var content = new StringContent(json, Encoding.UTF8, "application/json");

                HttpResponseMessage response = await client.PostAsync(ENDPOINT, content);
                response.EnsureSuccessStatusCode(); //this makes the client throw an Exception if the status code is not success
                string responseBody = await response.Content.ReadAsStringAsync();
                var responseJson = JsonDocument.Parse(responseBody);

                string answer = responseJson.RootElement
                    .GetProperty("choices")[0]
                    .GetProperty("message")
                    .GetProperty("content")
                    .GetString();
                return answer;
            }
        }
    }
}
As an exercise, you can try to make this into a looping code so that you can keep the conversation going after the first response.

